 How to Add, View and Delete
Maintenance
How to Add, View and Delete
Maintenance
Nomenclature
Owner: Businesses, such as a vehicle repair facility,
equate this to a client's name. It could also represent the vehicle's
legal owner. Once a specific owner is entered ( say John Jones ) it
is then available in the popup for future use.
Vehicle: A specific vehicle make and model. Once a specific
vehicle is entered ( say Acura ) it is then available in the popup
for future use.
Provider: Businesses might treat this as the technician
working on the vehicle. Otherwise, it would be the name of a car
dealer or retail service/repair facility. Once a specific provider
is entered ( say your favorite car dealer's name ) it is then
available in the popup for future use.
Task(aka Service Task): The specific maintenance performed
such as an "oil change", "engine filter change" etc. Task names can
be whatever you choose and are maintained via the "Maintain Item
List..." popup menu item at the bottom of the popup. Once a specific
task is entered ( say "new battery ) it is then available in the
popup for future use.
Owner, vehicle, provider and task must be specified when adding
maintenance.
Adding New Maintenance
Maintenance data is entered ( or selected ) via the fields
in the area labeled "Add or Delete Maintenance" followed by
pressing the "Add"(+) button.
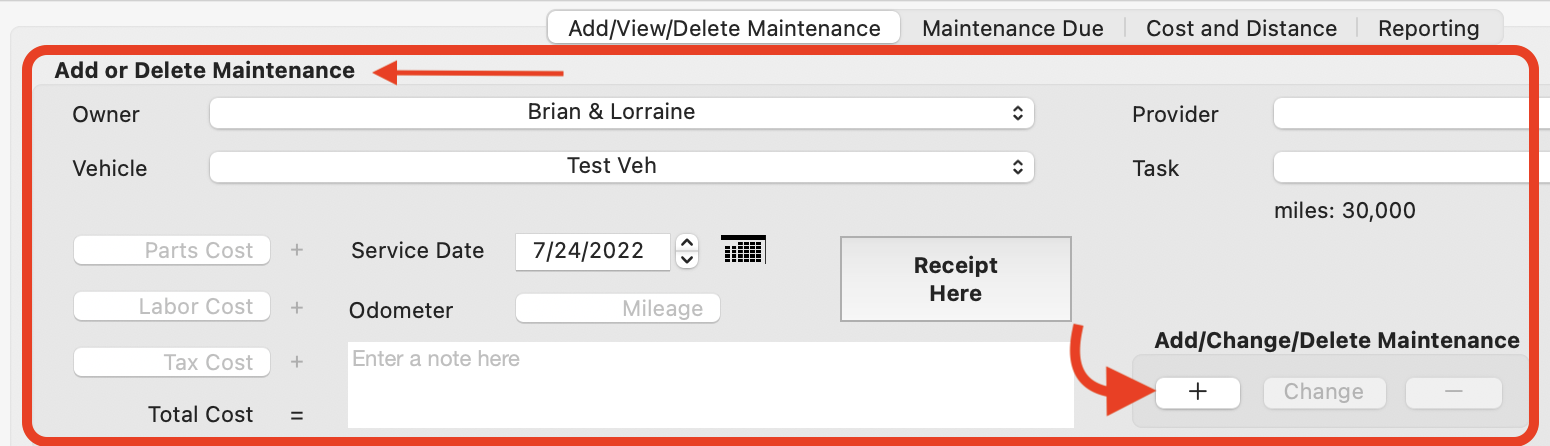
The owner, vehicle, provider and task popups must have valid
values before the maintenance can be added ( via Add button + ).
Service odometer( as miles or kilometers ), service date and
service cost must be entered but cost may be zero. The user may optionally
enter notes and/or a receipt as an image file.
Select the owner, vehicle, provider and task names from the
corresponding popup menus. There has to be at least one owner, one
vehicle, one provider and one task present before vehicle
maintenance may be added. Each popup menu's ( i.e. owner, vehicle,
provider and task ) content is maintained via the "Maintain Item
List..." option at the bottom of each popup menu. That option
should be used to add the appropriate data to the popup menus
before entering/adding maintenance data.
Viewing Existing Maintenance
Entered/completed maintenance tasks are shown on the lower section
of the window in tabular format when the application launches.
Maintenance data may be sorted by the column headers ( Owner, Vehicle,
Task, Date etc. ).

A subset of the maintenance may be displayed at the bottom of
the window by selecting various criteria( a specific vehicle,
owner, date range for example ) using the "Filter/Print List
Contents" box and pressing the Filter button.

Filtering existing maintenance does not add, change or
delete it; filtering only limits what maintenance is visible at
the bottom of the window.
The "Print" button generates a PDF of whatever maintenance currently shows in the table. The PDF can be printed
Deleting Existing Maintenance
The steps are:
(1) Double click one of the maintenance items in the tabular list
at the bottom of the window to activate the delete button(-). This will populate all the data for that particular maintenance item in the top portion of the window.
(2) Press the delete(-) button. There is no warning, so be
sure before pressing the delete button.
Changing Existing Maintenance
The steps are:
(1) Double click one of the maintenance items in the tabular list
at the bottom of the window to activate the "Change" button. This will populate all the data for that particular maintenance item in the top portion of the window.
Note: this is the same first step deleting maintenance uses ( see above ).
(2) Make any changes to the Cost(s), Date, notes, odometer or receipt fields
(3) Press the "Change" button.
Important: Do not change the owner, vehicle, provider or task of existing maintenance. If one of those needs to be changed, use this process:
Do step one(1) above to populate the data, change the owner, vehicle, provider or task to the correct one, now press the Add(+) button. This will result in a duplicate
maintenance in the list. Use the "Deleting Existing Maintenance" steps above to delete the duplicate with the incorrect data.
Task Addition, Usage and Deletion
Tasks consist of three elements: thetask name, the time interval
and the distance ( in miles or kilometers ) interval. Tasks may be
added ( if not already in the popup menu list ) during the
addition of a maintenance task or independently. When a task
is added, a task name, time interval and mileage/kilometer
interval must be entered. Like the owner names, vehicle names and
provider names, the tasks are saved for future use.
The time and mileage/kilometer intervals are used to calculate
when the next maintenance is due and indicate how often a task
should be performed. For example, some maintenance might be done
based on a time interval such as every three months, while elapsed
vehicle mileage/kilometers might be better in other cases. It is
up to the user to decide which is more appropriate.
Tasks may be deleted via the window that appears when selecting
the "Maintain Item List..."
menu item on the bottom of the task popup. Task deletion operates
the same way as Maintenance deletion described above by
double-clicking on the list portion of the window and using the
delete button (-)